It is currently 18 Oct 2025, 21:22


Big Block Makeover

For electronic related stuff like module repair, silver epoxy fixes etc.
  • Author
  • Message
Offline
User avatar

abem

Techno Mage

Techno Mage

  • Posts: 590
  • Joined: 17 Apr 2009, 05:10
  • Location: Madison, Wisconsin

Big Block Makeover

Post13 Nov 2009, 07:35

Hi.

I just got a Bulova Big Block in relatively nice shape, but I'd like to refinish the front surface around the display. This surface originally had a mirror finish, so obviously any scratches at all are readilly visible:
http://img526.imageshack.us/img526/8797 ... 0x1200.jpg

My questions are:

1) Does anyone have some pointers for restoring a mirror finish to stainless steel?
Do you start with fine emory paper and then move on to cerium oxide? What grades? How long should it take? Do you recommend using power tools or doing this by hand? Are there certain products and brands that are recommended?

2) Is there a trick to removing the crystal face in order to polish the front surface?
I'm not even sure if it's glass or plastic so I don't know if the oven / heat gun trick used on Pulsars is a good idea (obviously not for plastic!) or if there is another way to remove the crystal before polishing.

Thanks 1.0e6!

-abe.
Offline

smokefrog

Geek

Geek

  • Posts: 66
  • Joined: 22 Mar 2009, 01:22
  • Location: Shelby Twp. MI

: Big Block Makeover

Post13 Nov 2009, 16:43

Hello

The red plastic crystal is not glued to the case, just open the watch up and remove the module and it will fall out, just me mindful of the large pusher steam on the side and how it goes back together.

I not an expert on how to get the "mirror look"

Later

Gus
Offline
User avatar

digibloke

Wizard

Wizard

  • Posts: 391
  • Joined: 17 Aug 2005, 14:11
  • Location: Copenhagen/Denmark

: Big Block Makeover

Post14 Nov 2009, 00:22

If you just want to mirror polish that one surface at the front of the watch then I'd do this...

1) Take the bracelet off, module out lense out etc so you've just got the empty case. Make sure the case is solid stainless steel (otherwise forget it).
2) Put a good size splash of brasso (brass polish) onto a household cleaning cloth (anything will do as long as it's quite hard wearing and has no other abrasives in it) and leave it for a couple of hours for the brasso to dry (goes a light cream colour). Tape the cloth down on a perfectly flat none absorbant surface
3) Holding the watch so it's flat to the cloth polish like a lunatic for about half an hour. Keep changing direction and theres no need to press too hard. (it's a good idea to wear rubber gloves as the watch will get very hot quite quickly). This will almost certainly get rid of those light marks on the front.
4) Finish by using the brasso as instructed on the can. A light wet polish, leave it for a couple of minutes then buff off. Do this a couple of times and you'll have your mirror finish.

I think that using buffing tools often leads to losing the crisp edges on a case and I try to avoid Cerium oxide as it's not the most healthy stuff to have floating around my workspace (neithers brasso but at least it doesn't end in "ium" ;-) ). Jewelers rouge would also work but it's not much better than brasso and it's REALLY messy.
Offline
User avatar

bruce wegmann

Pulsar Moderator

Pulsar Moderator

  • Posts: 1310
  • Joined: 02 Aug 2004, 02:13
  • Location: San Diego, CA

: Big Block Makeover

Post15 Nov 2009, 05:42

I've looked at the pics of your watch, and, believe me, you'll never get those scratches out using a simple polish. There is a Hamilton model with an even larger area of polished steel on the face; here's what it took to bring it back to factory "look". You'll need a hard, flat surface [large enough to fully support an 8x10 inch sheet of good, wet-or-dry sandpaper]...the flatter, the better [I have a nice pink granite surface plate that works perfectly]. I would do this with water; it triples the cutting speed and makes the paper last longer. Start with 400 [sanding parallel to the long dimension of the face], and go until there is no trace of the deepest marks left. Go to 800 and sand at 90 degrees to the first, and go until there are no lines visible from the 400 grit. Then 1500, and finally, 2500 or 3000, reversing the direction of sanding until all marks from the previous grit are gone. 1500 produces a decent finish in stainless; 2500 or 3000 gives a true mirror effect. For a final polish, I use a pencil eraser-sized dab of SimiChrome polish, spread an inch wide and four or five inches long on a sheet of typing paper [still on the hard, flat surface], with firm pressure [this makes an excellent improvised lap]. A couple minutes of that, and you should be done [as in, you should be able to read reflected newsprint a foot or two away; BTW this same process, starting with 1000 grit, will also work well to remove similar defects in plastic lenses]. Start-to-finish, this shouldn't take more than 30 to 45 minutes. Oh, and don't EVER use power tools doing this sort of polishing; one bad slip and you've taken a dig out of an edge or the face, and you're back to square one. Take however long it takes to do it right; it's cheap insurance against a wasted afternoon, and the results will be worth it.
Last edited by bruce wegmann on 16 Nov 2009, 00:43, edited 1 time in total.
Offline
User avatar

abem

Techno Mage

Techno Mage

  • Posts: 590
  • Joined: 17 Apr 2009, 05:10
  • Location: Madison, Wisconsin

: Big Block Makeover

Post15 Nov 2009, 22:42

Thanks to everyone for the most excellent advice.

I worked on it yesterday and while it's not quite indistinguishable from new, it's definitely getting there. It's at least close enough to imagine new. I still need to locate some of the finer grades of abrasives mentioned by Bruce (I'm mising the 1500-3000 grades of abrasives). The finish is currently a sort of polished satin - you can see your reflection, but if you look carefully, you can still see some fine texture and the reflection is a little milky rather sharp and clear like the reflection from an actual mirror.

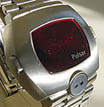
Here are the results so far along with a few lessons learned along the way.

Image


Lessons:
1) Use the right abrasives
I started with jeweler's rouge and found that after an hour of polishing, all I had succcedded in doing is to round the edges of the scratches. Bruce was absolutely right (no surprise there) - the simple polish was useless on scratches . There's no substitute for a complete set of graded abrasives. Having the right abrasives also saves a lot of time.

2) Work slowly and carefully
Since I was lacking a good intermediate grade of abrasive, I thought that I could make up for it with a finer abrasive and some "elbow grease". The result: during the frenetic rubbing, a particle of grit found its way between the cloth and watch and I ended up with a big ol gouge mark. Back to square 0 (or -1).

3) Have a clean, organized workspace
A tidier workspace could have possibly prevented the grit particle problem cited above.

I struck out yesterday in locating fine enough sandpaper, but I'm hoping that if I can find some 2000-3000 grade, then I can eventually get to that mirror finish. I still have a hard time imagining this taking less than a few hours, but I'm guessing that with the right tools and experience, it will get a lot quicker.

Again, thanks for the help.

-abe.
Last edited by abem on 16 Nov 2009, 05:40, edited 1 time in total.
Offline
User avatar

Sully008

Wizard

Wizard

  • Posts: 289
  • Joined: 14 Oct 2008, 18:19
  • Location: Wpg, Mb. Canada

: Big Block Makeover

Post16 Nov 2009, 01:09

Nice work so far, Abe! You can usually get 2000 grit and up sandpaper at an autobody supply store. It's usually used to wet sand clearcoating.
Offline
User avatar

abem

Techno Mage

Techno Mage

  • Posts: 590
  • Joined: 17 Apr 2009, 05:10
  • Location: Madison, Wisconsin

: Big Block Makeover

Post16 Nov 2009, 05:32

I found some 3M 2000 grit emory paper at an auto parts store. It works great for final sanding, but seems too coarse for polishing.

For polishing, I found a graded set of three abrasives that seem to get the job done. The first is a coarse inexpensive polishing abrasive powder called "Bar Keeper's Friend". This works well for removing fine scratches left by the emory paper, which is necessary before proceeding to fine polishing. The next stage is a rouge polish which is a dark red color. This gives the surface a semi-specular satin finish. For final polishing, I'm using a very fine pink colored cerium oxide paste. The cerium oxide is only useful for final polishing and won't remove any scratches visible to the naked eye. It works quickly on gold fill but stainless steel is so hard that it has only a subtle effect on it.

I read that emory paper is available up to 8000 grit. This approach seems preferable to the polishing powders and pastes because it would be easier, more controlled, and less messy. However, I haven't been able to locate emory paper over 2000 grit, so I can't say whether or not this is a viable approach.

-abe.
Offline
User avatar

bucko170

Guru

Guru

  • Posts: 3650
  • Joined: 20 Oct 2007, 11:47
  • Location: Nottinghamshire: The Home of Robin Hood..... UK

: Big Block Makeover

Post16 Nov 2009, 06:12

I haven't been able to locate emory paper over 2000 grit


eBay to the rescue....... Wet And Dry Sandpaper 2500 3000 4000 6000 9000 Grit

http://cgi.ebay.com/Wet-And-Dry-Sandpap ... 7912792bb0

Any good?
Offline
User avatar

bruce wegmann

Pulsar Moderator

Pulsar Moderator

  • Posts: 1310
  • Joined: 02 Aug 2004, 02:13
  • Location: San Diego, CA

: Big Block Makeover

Post16 Nov 2009, 11:16

That will certainly work; I'll need to find a source of supply a bit closer to home, though.
Offline
User avatar

retroleds

Guru

Guru

  • Posts: 3634
  • Joined: 04 Feb 2006, 10:34
  • Location: Surrounded by hicks and sticks (farms and woods) - Michigan,USA

: Big Block Makeover

Post16 Nov 2009, 16:02

Lapping films can be found at most machinists or "tool & die" stores.

Regarding the deep scratch, I'd suggest you first work perpendicular to the deepest scratches first, as sanding with a scratch tends to also get into the scratch and make it deeper slightly. Cleaning with alcohol and inking the deepest scratches with a permanent marker will also make them stand out better so you can see your progress. Your work was pretty good so far - keep at it, practice makes perfect! :-)
http://www.retroleds.com - Sales of vintage LED, LCD, analog watches, parts and gadgets - repair tutorials & tips
Nov. 2022 - back in business!! BItter divorce is in home stretch, come grabs some great deals, I had to open the safe . . . damn attorneys. piss.

Return to Electronical

Who is online

Users browsing this forum: No registered users and 62 guests